How to use Swing widgets in an Eclipse RCP application?
Eclipse RCP is a great platform for developing nice GUI applications with Java. It provides a wonderful framework to build application with its very useful publish-subscribe event model and annotation based dependency injection. It feels almost like magic when you switch from developing hard-coded Swing applications to Eclipse.
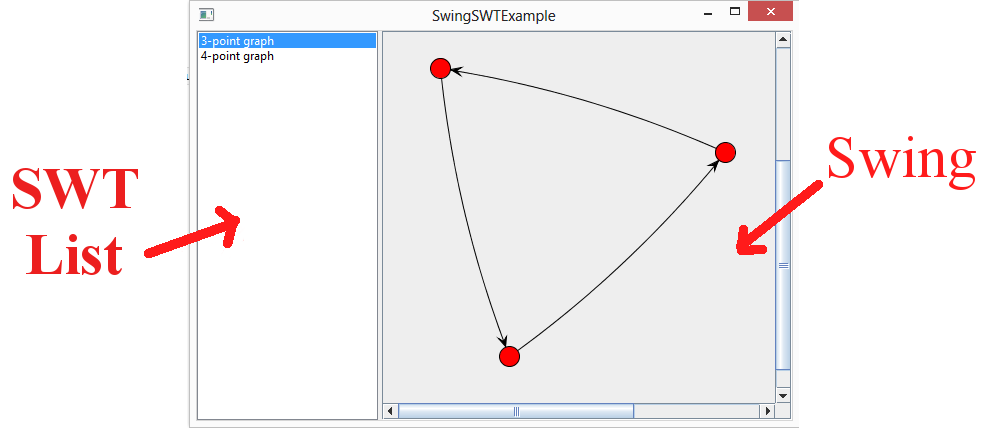
Sneak Peek: This is what the application looks at the end.
However, it uses SWT as its widget set which is independent of the Java AWT and Swing library. While, it would be a little absurd to develop Swing widgets for Eclipse RCP application considering the richness of the SWT platform, there are times when it is unavoidable. At times you have an existing Java application with a lot of custom Swing components or your application uses a third party visualization library like JUNG which is developed entirely in AWT/Swing. Converting every bit of Swing code to SWT in such a case is very expensive and time consuming. A good time-and-money saving approach in such a case would be to move to SWT, one step at a time with converting Swing code to SWT, as and when possible. Thankfully, the good members of the Eclipse community have made it really simple.
In this post, I will show a simple application that uses SWT and Swing at the same time, uses a library that is not available as a bundle (at least to my knowledge) and how events can be send from a SWT widget to Swing (of course it can be sent the other way around as well). That said, I will try not to explain details about Eclipse RCP development. I am expecting the reader has some idea about how to get started with Eclipse RCP application. If not, Lars Vogel has a very nice tutorial on Eclipse 4 RCP development.
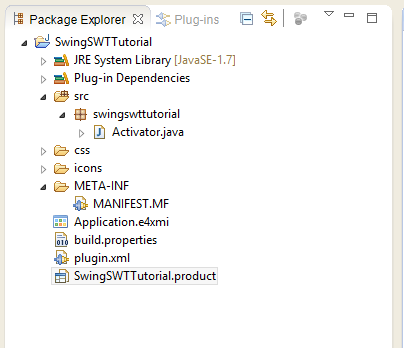
Before we begin, you will need to to install Eclipse and e4 (here are the instructions). Once you do that, create an Eclipse 4 project (File > New > Project > Eclipse 4 > Eclipse 4 Application Project). At this point, you will have a project that looks like this:
Double click on the SwingSWTTutorial.product file and select the overview tab. Click on the link that reads “Launch and Eclipse application”. You should see an empty window appear. Close the window now.
Next, lets design the application by specifying the application model. For that open the Application.e4xmi file and select the Form tab. You will see something like this (with certain nodes in the left-side missing which I will show how to add)
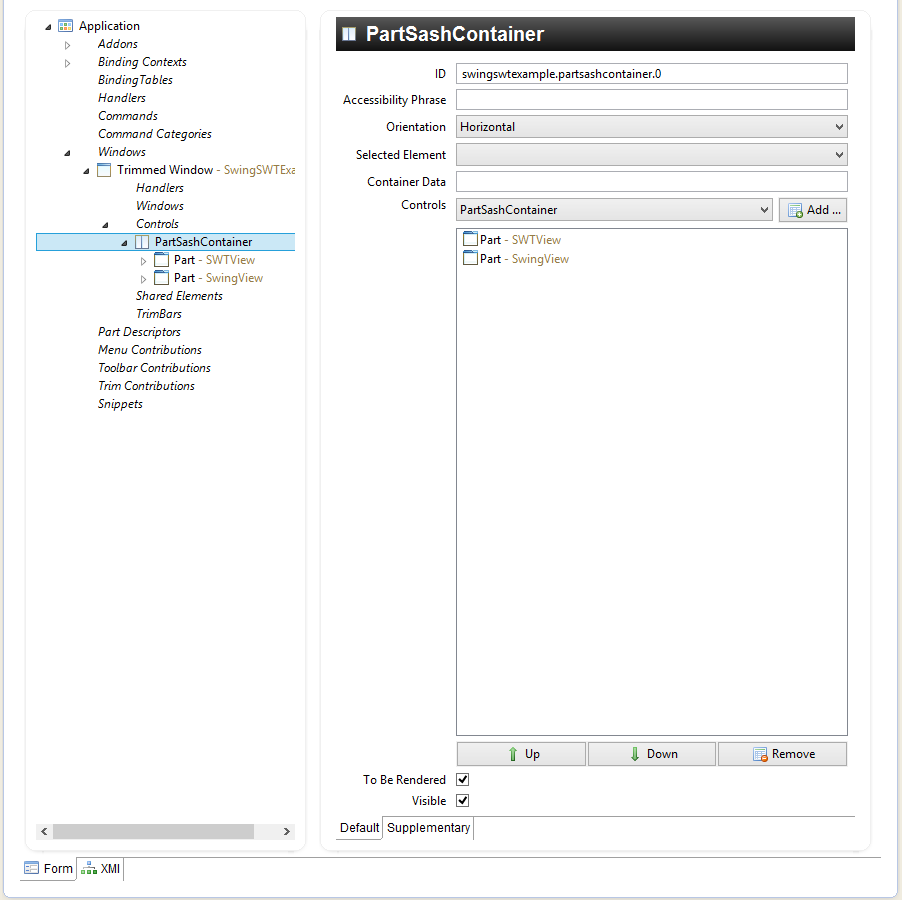
If you look at our final application, you see two panels juxtaposed (similar to the JSplitPane in Swing). To create this, go to Windows/Trimmed Window. Right click on Controls and Add child > PartSashContainer and selection Horizontal orientation. This is the container that will contain within it the SWT List and the Jung-Swing visualization.
Next right click this container to add two children using Add Child/Part. Click on the first Part and set the Label to be SWTView and the second to be SwingView (you can chose whatever label you want).
At this point, we have specified the skeleton of the application. Now we need to add code to fill our views and do some event sending and handling. But before that we need to add JUNG libraries to the project so that we can create and visualize a graph.
Go to JUNG’s download page at sourceforge. Click on jung2-2_0_1.zip file to download it. Extract this zip. This file contains several jar files. We need only a few of them. Create a lib folder/directory in the project and copy the following jars to it:
- jung-api-2.0.1.jar,
- jung-graph-impl-2.0.1.jar,
- collections-generic-4.01.jar,
- jung-visualization-2.0.1.jar,
- jung-algorithms-2.0.1.jar
We need to add these libraries to the classpath. To do that open META-INF/MANIFEST.MF and select Runtime tab. Go to the classpath section and click on Add… Navigate to the lib directory (that should have the jars now) and add all the jars. Check that the MANIFEST.MF file has following content for the Bundle-Classpath:
Bundle-ClassPath: lib/collections-generic-4.01.jar,
 lib/concurrent-1.3.4.jar,
 lib/jung-algorithms-2.0.1.jar,
 lib/jung-api-2.0.1.jar,
 lib/jung-graph-impl-2.0.1.jar,
 lib/jung-visualization-2.0.1.jar,
 .
Make sure that the period at the end is not missing. Try not to edit this file manually as it is sensitive to formatting.
Now that we have the external libraries in place, let us define our data structures. First create a package swingswttutorial.data and add two classes: GraphData and GraphRepository
public class GraphData {

	private final Graph<String, Number> graph;
	private final String name;

	public GraphData(String name, Graph<String, Number> graph) {
		this.name = name.trim();
		this.graph = graph;
	}

	public Graph<String, Number> getGraph() {
		return graph;
	}

	public String getName() {
		return name;
	}

	@Override
	public String toString() {
		return name;
	}

}
and
public class GraphRepository {

	private final List graphs = new ArrayList<>();

	public GraphRepository() {
		initializeGraphs();
	}

	public void initializeGraphs() {
		Graph<String, Number> g1 = new DirectedSparseMultigraph<String, Number>();
		g1.addEdge(1, "A", "B");
		g1.addEdge(2, "B", "C");
		g1.addEdge(3, "C", "A");
		graphs.add(new GraphData("3-point graph", g1));

		Graph<String, Number> g2 = new DirectedSparseMultigraph<String, Number>();
		g2.addEdge(1, "A", "B");
		g2.addEdge(2, "B", "C");
		g2.addEdge(3, "C", "D");
		g2.addEdge(4, "D", "A");
		graphs.add(new GraphData("4-point graph", g2));
	}

	public Object[] getElements() {
		return graphs.toArray();
	}
}
The GraphData is a simple structure containing a name for the graph and the JUNG Graph itself. GraphDataRepository is a collection of GraphData objects.
Once our data model is defined, we need to tell eclipse about the repository so that Eclipse can make it accessible throughout the application. To do that add following lines to Activator.java
IEclipseContext ctx = E4Workbench.getServiceContext();
ctx.set(GraphRepository.class, new GraphRepository());
Now, we will create the views. Create the package swingswttutorial.views
Lets first create the SWTListView.java
Now this is IMPORTANT. Lets create the SwingView first. Create class SwingGraphView.java
public class SWTListView {

	@PostConstruct
	public void postConstruct(Composite parent,
			final GraphRepository repository, final IEventBroker eventBroker) {
		final ListViewer viewer = new ListViewer(parent);
		viewer.setContentProvider(new IStructuredContentProvider() {

			@Override
			public void inputChanged(Viewer viewer, Object oldInput,
					Object newInput) {
				// TODO Auto-generated method stub

			}

			@Override
			public void dispose() {
				// TODO Auto-generated method stub

			}

			@Override
			public Object[] getElements(Object inputElement) {
				return ((GraphRepository) inputElement).getElements();
			}
		});

		viewer.setInput(repository);

		viewer.addSelectionChangedListener(new ISelectionChangedListener() {

			@Override
			public void selectionChanged(SelectionChangedEvent event) {
				int selectionIndex = viewer.getList().getSelectionIndex();
				Object selectedData = viewer.getElementAt(selectionIndex);
				if (selectedData != null) {
					GraphData gData = (GraphData) selectedData;
					eventBroker.send(AppConstants.GRAPH_SELECTED, gData);
				}

			}
		});
	}
}
Now go to the Application model file Application.e4xmi. Select the SWTView part and click on Find next to the class URI field. Find and select the SWTListView.java class that you just created. What this does is tells Eclipse to use this class to construct the view. This is how it works:
Eclipse creates an object of SWTListView and then calls postConstruct() method as we have annotated it with @PostConstruct annotation. You can call the method whatever you like as long as it is annotate properly. Now the magic takes place. When calling this method Eclipse sees that the postConstruct method takes two arguments: Composite and GraphRepository. Remember, we added GraphRepository object earlier in Activator.java. Eclipse finds this object and also the parent composite object. It inserts those objects in place and calls postConstruct() method. The next lines then create the list, specify the data and registers a selection change listener to the list.
When the selection changes, we send a event with the following key (if you will)
AppConstants.GRAPH_SELECTED //this is string constant
and the selected GraphData object. Now lets create the GraphView that will create JUNG’s swing visualization.
Here is the code for the class:
public class SwingGraphView {

	private GraphPanel p;

	@PostConstruct
	public void postConstruct(Composite parent) {
		Composite composite = new Composite(parent, SWT.EMBEDDED);
		Frame new_Frame = SWT_AWT.new_Frame(composite);
		p = new GraphPanel();
		new_Frame.add(p);
	}

	@Inject
	@Optional
	public void onGraphSelected(
		@UIEventTopic(AppConstants.GRAPH_SELECTED) GraphData graphData) {
		p.view(graphData);
	}

}
Let’s see what is happening here. Following are the lines that add the Swing JPanel to the SWT parent object. We create a new Composite object that can embed and has the injected parent as the parent. Next we create an AWT Frame using SWT_AWT class and the new composite. Register it to the SwingView in application model just like we did it for SWTView and its done.
Composite composite = new Composite(parent, SWT.EMBEDDED); //create a composite object that is set to embed
		Frame new_Frame = SWT_AWT.new_Frame(composite);
		p = new GraphPanel();
		new_Frame.add(p);
The final piece is listening to the selection change event sent by the SWTListView, so that we can update the corresponding graph. Look at the onGraphSelected method in SwingGraphView.java . This method is called when the selection in list view changes. But, how does Eclipse know to call this method. Another piece of magic! If you look at the method arguments, you can see that one of the parameters is annotated with the following annotation
@UIEventTopic(AppConstants.GRAPH_SELECTED)
What this annotation does is tells Eclipse to call this method when a event has the key AppConstants.GRAPH_SELECTED. Note that this is the same constant key with which we sent the selected data in the list view. What eclipse does is that it sets the value of the key, i.e. the selected GraphData object to be the parameter of the method and now you can ask the SwingJPanel to visualize the Graph.
We created an Eclipse 4 RCP application in which both Swing and SWT components (with SWT container). Also, we were able to easily communicate between the two elements. I did not paste the complete code in this post. You can find the complete code on github.
Now, go and start moving your Swing application to Eclipse.